
Declarative Docker Enterprise with Packer, Terraform, Ansible and GitLab - part 2
This is the second part in a series about building and upgrading Docker EE clusters while striving for a declarative approach. See part 1 for more background.
Post updated Aug 22 2018: Added conclusion section.
Creation
The first time a cluster is to be created, things are a little different. There are no existing VMs, and thus no services running on them. This makes things simpler in terms of how we apply the planned changes using Terraform.
Terraform config
In broad terms, the nodes that will make up the cluster are divided into three groups, which is reflected in our Terraform config:
- UCP Controllers (named
managers) - UCP Workers (named
workers) - DTR replicas (named
dtrs)
Here’s a list of variables that we define for every VM (using a map from VM name to value):
- MAC address
- Deployment stage
- vSphere Resource Pool
- vSphere host 1
- vCenter folder path
- Number of vCPUs
- Memory size in MB
- Disk size 2
- Datacenter name (e.g.
dc1ordc2) - Primary network name 3
- Storage network name 3 4
- Storage IP address 4
- Storage policy name 4
That’s a lot! Additionally, we have to ask the network team to create DHCP reservations and VIP addresses, ask our storage vendor to add the storage IP addresses to the whitelist for the given storage policy, and request TLS certificates for UCP and DTR from our internal PKI. Those are all tasks ripe for automation, but we haven’t got there yet.
But once all that is defined, we’re good to go and can run our pipeline in GitLab.5
GitLab pipeline
The GitLab pipeline is configured as a number of .gitlab-ci.yml files. Since we’re using GitLab Enterprise, we can include other YAML files from our main .gitlab-ci.yml file, leading to a slightly neater decomposition. However, we specify the same CI jobs for every cluster:
- Pre*
- Plan
- Apply
- Upgrade
- Re-run Ansible
* The “Pre” job is a single job that is always run before the plan phase.
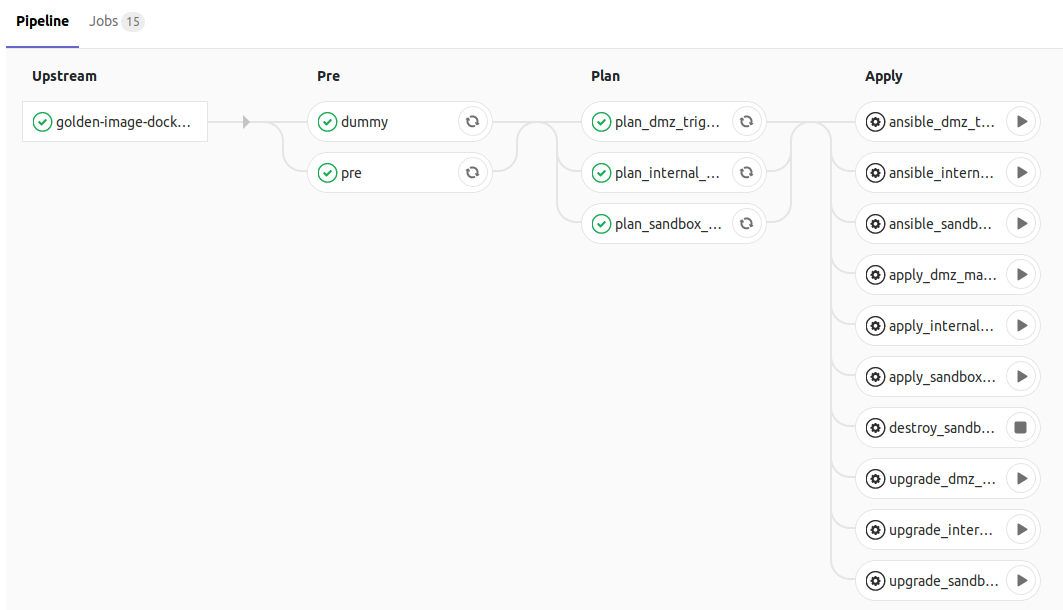
As can be seen in the above screenshot, we divide our pipeline into three phases (the “Upstream” phase comes from the job being triggered by the previous repo’s CI pipeline), namely:
- Pre
- Plan
- Apply
Preparing essential Docker images
The “Pre” phase has one proper job: Pull any essential Docker images from a registry that already exists (we still need to solve this catch-22), save them in a .tar.gz file for later use.
Planning
The “Plan” phase has a job for each cluster. The job gives the Terraform variables file pertaining to the cluster as the argument to the -var-file option of the terraform plan command and saves the output in a file that is archived in GitLab. The job output log will show what actions Terraform will perform if the plan is applied. For a new cluster, this will include a number of VMs in each of the managers, workers and dtrs resource groups, as well as a number of so-called null resources which are used, among other things, to insert custom scripts at different points in the lifecycle of applying the plan. Namely, this is how we run Ansible after Terraform has created the VMs. Terraform keeps track of the null resources, but they don’t represent an object in any other system.
Applying
Hang on, this is where it gets complicated!
The “Apply” phase’s main job is the “Apply” job. It fetches the plan from the “Plan” job and applies it by running terraform apply <plan.out>. For a new cluster, the following things will happen in sequence:
- Terraform creates the UCP Controller VMs (managers) by cloning the Docker + UCP VM template from part 1
- Terraform creates an Ansible inventory file only including the manager nodes in a group called
ucp(sorry about the naming inconsistencies) - Terraform runs the script in the
ansible_managersnull resource- Ansible runs a playbook that consists of multiple nested playbooks that contain the tasks for setting up the Docker Swarm cluster and installing UCP
- The current Swarm cluster status of each manager node is collected
- If there are no managers in any existing cluster (always the case first time around), the first manager will initialize a new Swarm cluster
- The UCP configuration file from our repo is copied into the VM and created as a Swarm config using the
docker config createcommand - The TLS certificates that we inject into the pipeline using a GitLab secret variable are copied into the VM and copied to a newly created
ucp-controller-server-certsDocker volume (instructions here) - The configured version of UCP is installed using
docker run ... docker/ucp:<version> install(see the install docs) - We wait for the
ucp-reconcilecontainer on the first manager node to exit successfully (see the UCP architecture page), indicating that UCP is up and running - We get the join token for Swarm managers from the first manager node by running
docker swarm join-token manager - We collect a list of remaining manager nodes to join to the cluster
- For each of the remaining manager nodes, one at a time, we do the following:
- Run
docker swarm join --token <token> <first-node-addr>:2377to join the Swarm cluster - Wait for the
ucp-reconcilecontainer on the first manager node to exit successfully (see the UCP architecture page), indicating that UCP is up and running
- Run
- Ansible runs a playbook that consists of multiple nested playbooks that contain the tasks for setting up the Docker Swarm cluster and installing UCP
Once the manager nodes have been joined into a working Swarm/UCP cluster, we need to perform additional configuration of UCP for it to suit our needs. This is also done as part of the pipeline. Our Terraform config has a couple of additional variables:
- Teams (a mapping from team name to LDAP filter)
- Grants (a mapping from collection to a tuple of a team name and a role)
Using the UCP HTTP API, we create the teams, checking for each one that it does not already exist, and configure its LDAP sync settings. We then create all the collections from the “Grants” variable. Some collections run several levels deep, and for those, we add a dummy entry to create their parent collections first. Once the collections have been created, we create grants for the teams with the specified roles. All this required some extra Ansible foo - the import_tasks action comes in handy, as it allows running a sequence of tasks for each element in a given map/dict or list variable.
- Terraform then creates the Worker and DTR nodes
- Terraform creates an Ansible inventory file including the manager nodes in a group called
ucp(sorry about the naming inconsistencies), the worker nodes in a group calledworkerand the DTR nodes in a group calleddtr -
Terraform then runs the script in the
ansible_allnull resource- Ansible runs a playbook that consists of multiple nested playbooks that contain the tasks for joining the worker nodes, install DTR and join DTR replicas
- We get the join token for Swarm workers from the first manager node by running
docker swarm join-token worker - The current Swarm cluster status of each non-manager node is collected
- If the node is not already in the cluster, we join it by running
docker swarm join --token <token> <first-node-addr>:2377 - We add a Swarm node label to every node based on its value from the Terraform config’s deployment stage variable (this is later used for constraining Swarm services to specific stages when the user has access to multiple stages), and one that signifies what datacenter the node is in
- We also add a Swarm node label to assign each node to a UCP collection by setting the
com.docker.ucp.access.labellabel, e.g. toprod, which will restrict which UCP users will be able to see and interact with/schedule services on the node - We wait for the
ucp-reconcilecontainer on the first manager node to exit successfully (see the UCP architecture page), indicating that the UCP worker components are up and running - When all worker and DTR nodes are correctly configured as plain workers, we need to install DTR:
- If there are no existing DTR containers on any DTR node (we check for the presence of a
dtr-api-*container), we install DTR using thedocker run ... docker/dtr installcommand, referring to the load-balanced VIP address of our UCP cluster (using the--ucp-urloption), and provide the NFS address of our externalized storage (using the--nfs-storage-urloption) as well as the TLS certificates (using the--dtr-{ca,cert,key}options) - For each of the remaining DTR nodes, we run the
docker run ... docker/dtr joincommand, which replicates the DTR database to the joining replica nodes and makes them part of the DTR cluster
- If there are no existing DTR containers on any DTR node (we check for the presence of a
- We get the join token for Swarm workers from the first manager node by running
- Ansible runs a playbook that consists of multiple nested playbooks that contain the tasks for joining the worker nodes, install DTR and join DTR replicas
Phew, that was a lot, and that was even skipping over a few details!
Upgrading
The upgrade starts out with a list of what template was used for each VM currently in the cluster, then swaps out one at a time with the most recent template.
E.g., if the template list looked like this:
templates = {
    "ucp1"    = "Ubuntu1604DockerTemplate-20180604-154739-master-50798-push"
    "ucp2"    = "Ubuntu1604DockerTemplate-20180604-154739-master-50798-push"
    "ucp3"    = "Ubuntu1604DockerTemplate-20180604-154739-master-50798-push"
    "worker1" = "Ubuntu1604DockerTemplate-20180604-154739-master-50798-push"
    "worker2" = "Ubuntu1604DockerTemplate-20180604-154739-master-50798-push"
    "worker3" = "Ubuntu1604DockerTemplate-20180604-154739-master-50798-push"
}
… we first look up the deployment stage for each node. We process them in this order: UCP, DTR, Workers (in increasing deployment stage order, i.e. dev –> prod). Then we proceed by swapping in the new templat name for the ucp1 node, and the template list will look like this instead:
templates = {
    "ucp1"    = "Ubuntu1604DockerTemplate-20180820-022846-master-63776-pipeline"
    "ucp2"    = "Ubuntu1604DockerTemplate-20180604-154739-master-50798-push"
    "ucp3"    = "Ubuntu1604DockerTemplate-20180604-154739-master-50798-push"
    "worker1" = "Ubuntu1604DockerTemplate-20180604-154739-master-50798-push"
    "worker2" = "Ubuntu1604DockerTemplate-20180604-154739-master-50798-push"
    "worker3" = "Ubuntu1604DockerTemplate-20180604-154739-master-50798-push"
}
You’ll notice the template for ucp1 having changed from Ubuntu1604DockerTemplate-20180604-154739-master-50798-push to Ubuntu1604DockerTemplate-20180820-022846-master-63776-pipeline. A useful tool called json2hcl (Docker image) helps us convert between Hashicorp’s HCL configuration format and JSON, allowing us to manipulate the config with jq.
We then run terraform plan followed by terraform apply, and Terraform should then show the ucp1 VM as tainted since its template VM name has changed, forcing the VM to be destroyed and a new one created in its place. Thankfully, Terraform allows us to hook into the destroy process, running scripts before the VM is destroyed. Furthermore, we can abort the destruction of the VM if our script errors out, allowing us to stop the process and carry out manual intervention when facing specific failure conditions. Terraform remembers its progress and will re-attempt to replace the VM next time we run the pipeline.
Here’s the general process for upgrades:
- Retrieve list of templates for current nodes from Terraform
- For each stage (usually in this order: UCP, DTR, other workers):
- For each VM in that stage:
- Update the template name to the most recent from the VMware vCenter catalog (the selection mechanism is likely to be improved to be more granular)
- Run
terraform planfollowed byterraform apply, resulting in:- Terraform running a pre-destroy script that runs an Ansible playbook:
- Draining the node from running tasks6
- Performing additional tasks for UCP* or DTR** nodes
- Having the node leave the swarm and remove it from the node list
- Terraform destroying the existing VM in vSphere
- Terraform creating a new VM in vSphere cloned from the new template
- Terraform running the scripts of the
ansible_managersandansible_allnull resources as described in the Apply section:- Joining the new VM to the Swarm cluster, wait for it to be marked as healthy
- Putting the VM in the right UCP collection (using node labels) so tasks can be scheduled on it
- Performing additional tasks for UCP* or DTR** nodes
- When the last VM has been successfully upgraded to the same Docker Engine version, UCP and DTR are upgraded if the desired version is newer than what’s currently installed:
- We take a backup of UCP using the
docker run ... docker/ucp backupcommand, and copy the resulting archive to the GitLab runner for archival. - UCP is upgraded by running
docker run ... docker/ucp upgradecommand, and the command runs synchronously until the upgrade completes. - We take a backup of DTR’s metadata (not its image data, which resides on an NFS share), which takes a considerable time, and copy the resulting archive to the GitLab runner for archival. Note that we have to run the output of the backup command through
gzipfor the resulting file size to be small enough that Ansible’s expensivefetchaction doesn’t consume all available memory on our GitLab runner VM. - The process is similar for DTR,
docker run ... docker/dtr upgrade, which upgrades each component one at a time on each DTR replica.
- We take a backup of UCP using the
- Terraform running a pre-destroy script that runs an Ansible playbook:
- For each VM in that stage:
* If the node being upgraded is one of the UCP controllers, when it is to be destroyed, it is demoted such that the other controllers will be made to know about the (temporary) new number of controllers.
** If the node being upgraded is one of the DTR replicas, when it is to be destroyed, it is first removed from the DTR cluster such that the other replicas will know about the (temporary) new number of replicas. When its replacement has been joined to the cluster as a worker node, it is additionally joined to the DTR cluster to become one of the available replicas.
Conclusion
Using this method, we can use the same approach whether we upgrade Docker Engine, add new Ubuntu packages or apply a security patch, by simply doing that once in our VM template and rolling the upgrade out across our cluster. There’s no ambiguity about whether a node is updated or not; it is either based on the latest VM template, or it isn’t. If it is, it’s up to date.
Once we’ve gone through a few more supervised rolling upgrades, we want it to be a regular scheduled job (GitLab can help with visibility there compared with an oldfashioned cron job), e.g. running weekly.
In an upcoming post, I will provide a deep dive into the configuration of the various tools involved, namely Packer, Terraform, Ansible and GitLab, and any quirks that may be useful to other organizations.
-
The direct host assignment will be replaced with DRS group membership, the management of which was introduced in the Terraform vSphere Provider v1.5.0. ↩
-
Since the disk size must be identical to that of the VM template when using linked clones, this is practically always the same for all VMs. ↩
-
These are made as indirect lookups to prevent data duplication. ↩ ↩2
-
These related to our use of the Netapp Docker Volume Plugin. ↩ ↩2 ↩3
-
Naturally, we have to define numerous variables in GitLab itself, too, in order to be able to externalize some configuration and to provide secret variables. ↩
-
When a Swarm node is put in the
drainavailability status, it currently doesn’t wait for tasks to exit gracefully – rather, they are stopped rather shortly after, thus potentially causing downtime if the service does not have any replicas on other nodes in the stage. ↩
Leave a comment